EMCO 100-Plus Storm Door Install Tips
Andersen has been in the door and window business for a long time and they've made their DIY storm door installation process easy enough for those with basic skills, tools, and a willingness to study the instructions. In this article we'll offer a few tips for installing an Emco 100-Plus storm door.
Emco 100-Series Plus storm door
Emco storm doors come in several models starting with the 100 Series. There are two models of the 100-Series storm doors, and the difference between the 100 and the 100-Plus storm doors is the installation process. The 100-Plus offers the 2-Hour Easy Install option while the 100 does not. There's about a $30 price difference between the 100 and 100-Plus, but if you haven't installed a storm door before, the Easy Install is worth the extra $30.
Will the storm door fit
Most of the Emco storm doors are designed to be installed within standard entry doors that have brick molding. If you have an older entry door you'll need to find out if the storm door will fit within your door's trim, or if you need to do some kind of build out. Lowe's and Home Depot offer storm door installation for about $125, and the install cost usually includes measuring the existing entry door to make sure the storm door will fit along with delivery of the storm door, so if you can't fit the door into your vehicle and have to pay for delivery it might be worth another few dollars to have the door installed. Your Home Depot might have different policies, or the policies may change over time.
Tools you'll need to install the storm door
Most of the holes that need to be drilled require a 1/8" bit which is included in the package, but you'll need to supply a 3/32" drill bit for drilling the latch strike, and a 5/16" bit for the door handle. Both bits are normally part of any basic drill bit kit that most homeowners have on hand such as the DeWalt Titanium 14-Piece drill bit set (Amazon) which will have all the drill bits you'll need for the install. The other tools Emco recommends are: a drill, screwdrivers (flat, Phillips), pencil, tape measure, pliers, scissors, center punch, hammer, gloves, and safety glasses. All the screws and hardware needed for the install are included in the door package. There's a fair amount of holes to drill and screws to install so don't forget to charge your cordless drill the night before.
Tools you might not need
The door sweep that comes with the 100 Series storm door is usually one piece so it doesn't require sliding the sweep into a channel and crimping the channel as shown in the Emco video (no need for pliers), and the sweep fits the length perfectly so won't need to be cut to size (no need for scissors). The instructions say to use a hammer and center punch to mark the holes for drilling the sweep, but I just mark the locations with a pencil then drill the holes, so no center punch is needed. Your storm door might have different components.
Emco storm door installation instructions
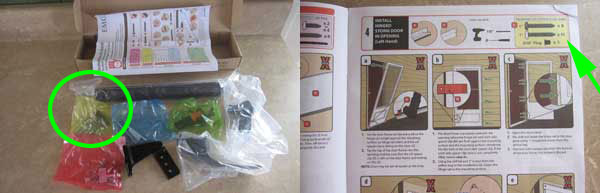
The instructions are very detailed and Emco has divided the pieces and parts into small color-coded bags which correspond to each particular color-coded section of the instructions. Even so, it helps to watch the 20-minute installation video on the Andersen website for clarification. The Emco video installs a 400-Series storm door instead of a 100-Series Plus storm door, but the overall installation process was similar (except for the door handle) and helps to clarify some of the unfamiliar terminology. The image below shows the color-coded bags on the left and an inset of an instruction page on the right. The instruction page shown is referencing (top right) the hardware contents of the yellow bag.
Emco Two-Hour easy install
Once underway, the actual storm door install should take about an hour - 30 minutes to prep (add door sweep, etc.) and install the door itself, and another 30+ minutes to install the door handle, door closure, and make final adjustments. That time frame doesn't include reading the instructions, getting familiar with the pieces and parts, watching the 20-minute Emco video, and setting up the workspace (sawhorses, drop cloth, dustpan and broom, etc). The total installation time will probably be closer to three hours.
Installation tips for the Emco storm door handle
The instructions tell you to check clearances so the storm door handle clears your entry door handle and deadbolt, and this step is very important. Emco includes a paper template and the instructions suggest measuring down 39.5" for the centerline of the template, but 39.5" can sometimes interfere with existing entry door hardware and the storm door won't be able to close. The easiest way to get your door's measurement is by holding the latch plate in place on the jamb where it doesn't interfere with the entry door hardware, mark the centerline of the latch plate, then measure down from the top of the storm door to get the measurement. The image below shows locating the centerline for the template:

Spend as much time as you need on this step because if you don't get it right and drill the three 5/16" holes into the storm door in the wrong place, there won't be any easy or aesthetically pleasing way to fix the mistake and make the storm door weathertight.
Final tips for installing the Emco storm door
- When cutting open the box, stay close to the dotted cutting line that's shown on outside of the box. There's not a lot of room to play with and you might scratch the door with the knife.
- If the door has to be left outside and it might rain, the main instructions are under the door and not in a plastic bag so you might want to take them out of the box. Ditto for the small box that contains the hardware instructions.
- Don't throw anything away after unpacking the door. Those orange spacers look like packing material to keep the door from sliding around in the shipping box, but they're an important component of the install. Same with the striker shims for the latch plate.
- The instructions are based on the color-coded bags so don't open the bags until they're needed, or if you want to open them to become familiar with the hardware, at least put the parts in separate marked plastic containers.
- Just snug the door sweep screws - don't tighten them, especially the last screw on the hinge side. Once the storm door is in place you'll need to adjust the sweep using those screws and the edge thickness of your entry door might make it tough to get the screwdriver into the last hinge-side screw on the sweep perfectly straight.
Andersen EMCO 2-Hour storm door installation video
Here's the Andersen Emco 2-Hour Easy Install storm door installation video:
Worth the effort
A storm door can make a big difference in your home's curb appeal. Storm doors also keeps the bugs at bay and adds another small layer of energy efficiency. With just basic carpentry skills and the patience to read the instructions several times over, you shouldn't have any problems installing a storm door on your own.